.webp)
As a best practice, ecommerce stores should always use two sources to track the ROAS of campaigns. When you rely solely on the Facebook Pixel for conversion information, you are assuming that Facebook provides unbiased and complete data. Since advertisers tend to show themselves in the best light, it is a smart idea to cross-check Facebook Ad performance in Google Analytics. It is easy to do with a few key UTM tags. Tagging can also be referred to as: URL tracking, link tracking, UTM tagging or campaign tracking. Let’s walk through the steps of adding tags to your Facebook Ads so you can more accurately measure performance.
Steps to Add Custom UTM Tags in Your Facebook Ads
Step 1) Create a new campaign in Facebook
Go to the Ads Manager in Facebook and create a new ad. Select the Campaign Objective and then set your Audience, Placements, Budget and Schedule. Walk through each step of adding in creative content including the Format of the ad and all Media.
Step 2) Fill out the Website URL
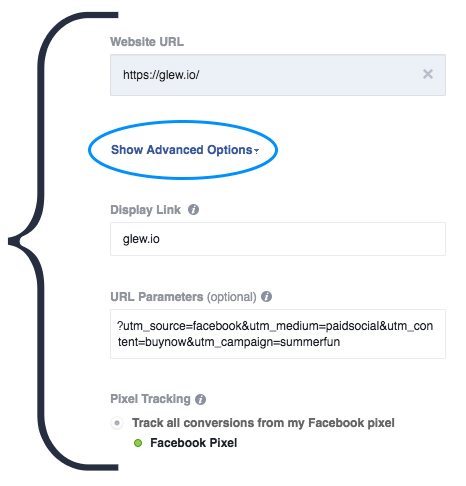
Now you are at the Page and Links section. First fill out the Website URL section. Clicks on your ad will be directed to this URL.
Step 3) Show Advanced Options
After adding in the Headline, Text and Call to Action, click "Show Advanced Options." This is where we will set up our custom parameters.
Step 4) Add in the Display Link
Fill out the Display Link with the URL you want to be displayed on your ads. For most stores this would be the homepage. You can think of this link as a vanity link that masks all of the extra formatting.
Step 5) Input the URL Parameters
Finally add in the URL Parameters that you want strung behind the Website URL. Remember that the more detail you add into your tagging, the more data you have to work with. The source should be set to Facebook and the medium will depend on your company’s tagging etiquette. Some common examples for medium are: “paidadvertising,” “remarketing,” or “ad.” You can add any custom parameter that Google Analytics tracks.

Can You Use UTM Parameters to A/B Test in Facebook Ads?
Yes! Facebook ads are a great place to implement A/B testing. Try running an ad with varied text on the Call to Action button. In order to properly track the effectiveness of each iteration, your Ad Content and Keyword parameters should be filled out in the link.
Examples of Ad Content and Keyword Tagging
“utm_campaign=SummerFun&utm_content=ShopNow”
“utm_campaign=SummerFun&utm_content= LearnMore”

When you are viewing this data in Google Analytics both ads will be grouped until you get to the keyword level. This means you can report on the overall effectiveness of the campaign, while still seeing which Call to Action resonated with your audience.
Viewing Conversions & Campaign Reports in Google Analytics
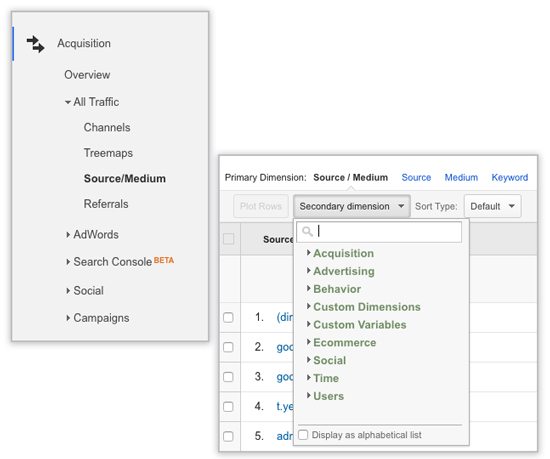
When viewing your reports in Google Analytics, go to the Acquisition tab. Under “All Traffic” click on “Source/Medium.” The Source/Medium screen will show you the traffic from each source as well as the Revenue generated by each source. Filter even further to see all of the rich insights on your campaigns by clicking on the "Secondary Dimension" filter.

Glew Shows a Direct Link from Facebook Ads to Revenue
Go one step further in your reporting. Glew combines data from your ecommerce store with Facebook Advertising data to provide insights into the effectiveness of your ads. You can quickly see if Facebook is contributing to your bottom line and which set number of campaigns are really bringing in customers.
As an unbiased, objective tool, Glew is more comprehensive than Facebook and less complicated than Google Analytics. When you spend a large amount of time and money on social advertising, it is vital to understand how each channel contributes to your business. Skip the laborious process of data digging and let Glew get right to answers that help your bottom line.

.webp)
.webp)
.webp)